Texture mapping, Part 3
The theme for this part of the reading is thinking about the underlying
reality of a texture, which is an array of texels. You can think of the
texture as a function from a pair of real numbers, (s,t), to either
- bytes for
THREE.LuminanceFormat, or - triples of bytes for
THREE.RGBFormat
A byte is, for our purposes, an integer from 0 to 255, inclusive.
In other words, a texture is a function with a discrete value, not a continuous value.
Linear vs. Nearest
Remember this demo of mapping a flag onto a plane:
In the source code, there are two settings that were not explained:
    var obj = new THREE.DataTexture( array, width, height, format);
    obj.minFilter = THREE.NearestFilter;
    obj.magFilter = THREE.NearestFilter;
Now is the time to explain these filters.
Going back to our observation that textures are discrete-valued functions, let’s consider the “NASCAR” flag (black and white checks). Actually, let’s simplify it much further. Let’s make the flag just 4x4 checks and consider just one dimension. Thus, we get a function like this:
| s | value | color |
|---|---|---|
| 0-0.25 | 0 | black |
| 0.25-0.50 | 255 | white |
| 0.50-0.75 | 0 | black |
| 0.75-1 | 255 | white |
It might look like this:
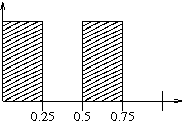
What’s the value when the parameter is 0.49? What’s the value when the parameter is 0.51? It’s an abrupt change, isn’t it? When we do this, we are choosing the nearest texel, and we expect there to be abrupt transitions between texels.
What if we want a smoother transition between texels? In this case, we could interpolate. That is, we consider the “ center” of each texel, and when a parameter falls between the centers of two texels, we can linearly interpolate between the two possible output values.
Here’s a table that shows the centers.
| s | center | value | color |
|---|---|---|---|
| 0-0.25 | 0.125 | 0 | black |
| 0.25-0.50 | 0.375 | 255 | white |
| 0.50-0.75 | 0.625 | 0 | black |
| 0.75-1 | 0.875 | 255 | white |
It might look like this:
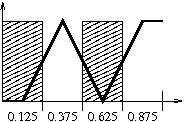
The values that are in between zero and 255 will be shades of gray in a luminance format. In an RGB format, we would separately interpolate between values for red, green and blue. Note that we’re not going to worry about what happens at the edges. We just want to understand the basic idea of interpolating between texels.
When viewed like this, with very few texels, the linear version usually looks
… er, … bad. Fuzzy at best. However, in real life, when we load an image
to use as a texture, the texture often has lots of texels, and interpolation
looks pretty good. In fact, it is the default for Three.js. (All those
images of Buffy used interpolation, and they looked fine.) Nevertheless, you
should know about THREE.NearestFilter, in case you want it, particularly if
you’re using a small image with sharp edges.
MagFilter versus MinFilter
The discussion above is entirely based on when the texture is smaller than the fragment. We’ve got, say, 100 pixels to color, and only 4 texels, so the texture coordinates of those pixels will be 0.01, 0.02, 0.03, … Hence the choice about interpolation and nearest.
This situation is when we use the minFilter.
There’s an analogous situation that occurs, perhaps when an object’s
projection is small and the texture is large, that there are more texels than
pixels. Then, the texture parameters might actually skip over some texels. We
can still make a choice about whether to choose the nearest texel or
interpolate between two. That situation is when we use the magFilter (for
magnification ).
In practice, we often choose the same value for both, because we either want interpolation or we don’t.
Working With Arrays
Should you want to compute your own texture, as we did in creating these flags, you need to know a little about the underlying representation.
You know, of course, that an image is a rectangular array of pixels, and each
pixel is either one byte (THREE.LuminanceFormat) or three bytes
(THREE.RGBFormat). However, arrays of two or three dimensions are a higher
level of abstraction. The underlying reality, in memory and in the graphics
card, is that all arrays are one-dimensional.
There are several choices for building multi-dimensional arrays out of 1D arrays. We will only discuss row-major order. Consider a luminance array of 12 bytes. The underlying reality is that the bytes are numbered like this:
00 01 02 03 04 05 06 07 08 09 10 11
In almost every high-level language, array elements are numbered starting at zero, because at a lower level, the index indicates how much to add to the address of the beginning of the array in order to get to the desired element. In other words, the index is a distance.
Now, we want to build a 2D array out of these 12 elements. Let’s suppose it’s 3 rows and 4 columns, with the rows numbered 0-2 and the columns 0-3. The array looks like this:
| col0 | col1 | col2 | col3 | |
|---|---|---|---|---|
| row0 | 0,0 | 0,1 | 0,2 | 0,3 |
| row1 | 1,0 | 1,1 | 1,2 | 1,3 |
| row2 | 2,0 | 2,1 | 2,2 | 2,3 |
What we want, then, is a way to convert a pair of values (row, col) into a distance from the beginning of the array.
We now have a choice:
- do we put the first row consecutively in memory, then the second row, and so forth? This is called row-major order.
- do we put the first column consecutively in memory, then the second column, and so forth? This is called column-major order. Most languages use row-major order, but some use column major order and some use indirect arrays, which we won’t talk about since they’re not used in computer graphics.
Row Major Order
We choose row major order. To determine how to implement it, let’s first write down the distances:
| col0 | col1 | col2 | col3 | |
|---|---|---|---|---|
| row0 | 0 | 1 | 2 | 3 |
| row1 | 4 | 5 | 6 | 7 |
| row2 | 8 | 9 | 10 | 11 |
You’ll notice that each cell’s distance is one more than the cell to its left, and 4 more than the one above it. The 4 comes from the fact that the length of each row (equivalently, the number of columns or the width ) is 4.
A little playing with numbers, and you’ll determine the following formula:
index = 4 * row + col
This is a pretty simple formula. Note that if we numbered rows and columns starting at 1, the formula would become:
index = 4 * (row-1) + (col-1)
which is much uglier. The general formula is, of course:
index = width * row + col
3D Arrays
I’ll leave as an exercise for the reader building even higher dimensional
arrays out of 1D arrays using row-major order. However, you can think of the
THREE.RGBFormat as a 3D array, where we have a 2D array of RGB triples, and
the RGB triples are the innermost dimension. Thus, the layout is:
| col0 | col1 | col2 | col3 | |
|---|---|---|---|---|
| row0 | 0,1,2 | 3,4,5 | 6,7,8 | 9,10,11 |
| row1 | 12,13,14 | 15,16,17 | 18,19,20 | 21,22,23 |
| row2 | 24,25,26 | 27,28,29 | 30,31,32 | 33,34,35 |
You can see there are 36 bytes (numbered from 0 to 35), and the distance (also called the stride ) from row to row is now 12 (4 columns of 3 bytes each). The stride from column to column is just 3 (because you’re skipping one RGB triple).
The total size, in bytes, of the array is
width * height * 3
The formula for the index of a byte is:
index = (width3) * row + 3col
You can probably easily derive the more general formula.
NASCAR Flag Code
Now we’re prepared to understand the code to build a flag, or any texture, in raw JavaScript. Let’s start with the easiest one, the NASCAR flag (black and white checks):
function (log2size) {
    // returns an array containing a grayscale checkerboard pattern of
    // black and white squares where the size is NxN where N = 2^log2size.
    var size = TW.power2(log2size);
    var i, j, n = 0;
    var data = new Uint8Array( size * size );
    for( i = 0 ; i < size ; ++i ) { // each row
        for( j = 0 ; j < size ; ++j ) { // each column
            if( (i&1) != (j&1) ) {
                data[n++] = 255;
            } else {
                data[n++] = 0;
            }
        }
    }
    return data;
}
This code allocates a special kind of JavaScript array, in which the datatype
of each element is a byte, also known as an unsigned 8-bit integer value, or
Uint8.
Also, because most textures work best if their dimensions are powers of two, the size is specified indirectly as the log of the size, so evaluating this with an argument of 5 gives you a 32 x 32 flag, and 6 gets you 64 x 64, etc.
In the code above, we keep a separate counter, n, which is just the distance
from the beginning of the array. We can then use a “clever” trick to determine
if the row and column are different parity (even/oddness). The JS code x&1
extracts the right-most bit of the number x by ANDing it with a 1. Thus the
following expression alternates between true and false as we traverse the
array:
if( (i&1) != (j&1) ) { ...
Can you think of a way to simplify this code?
Checkerboard Flag
The checkerboard flag is similar, but of course, we have to set three values to get red and black squares:
function (log2size) {
    // returns an array containing an RGB checkerboard pattern of
    // black and red squares where the size is NxN where N = 2^log2size.
    var size = TW.power2(log2size);
    var data = new Uint8Array( 3 * size * size );
    var i, j, n = 0;
    for( i = 0 ; i < size ; ++i ) {
        for( j = 0 ; j < size ; ++j ) {
            if( (i&1) != (j&1) ) {
                // red
                data[n++] = 255;
                data[n++] = 0;
                data[n++] = 0;
            } else {
                // black
                data[n++] = 0;
                data[n++] = 0;
                data[n++] = 0;
            }
        }
    }
    return data;
}
The remainder of this reading elaborates on the implementation of the creation of the US Flag textures – you can just skim this part.
US Flag
Those were both pretty easy. Now, let’s look at the US Flag, where we really have to think about row-major order. We’ll start with black and white, where we have black stripes where the real flag has red stripes, and black for the union (the blue part). It’s not important to understand every line of this code, but you should understand how we figure out the color (black or white) of various kinds of texels:
function (log2size) {
    // returns an array containing a grayscale USFlag pattern where the
    // size is width x height where height = 2^log2size and width is twice
    // that.  We'll use black for red and blue, white for white
    var height = TW.power2(log2size);
    var width = height * 2;
    var i, j, n = 0, len = width * height;
    var data = new Uint8Array( len );
    data.width = width;
    data.height = height;
    for( i = 0 ; i < len; i++ ) data[i] = 0x80;  // initialize all to 50% gray
    // "colors".
    var RED = 0x00;
    var WHITE = 0xFF;
    var BLUE = 0x00;
    // compute flag specs
    var stripe_height = Math.floor(height / 13);
    if( stripe_height < 1 ) {
        throw "size isn't big enough for 13 stripes: "+height;
    }
    var hoist = stripe_height * 13;
    var fly = Math.floor(hoist * 1.9);      // from flag spec
    // console.log("hoist and fly: "+hoist+", "+fly);

    function doStripe(stripeNum,color) {
        var startrow = stripeNum*stripe_height;
        var nextrow  = (stripeNum+1)*stripe_height;
        var r, c;
        for( r = startrow; r < nextrow; r++ ) {
            for( c = 0 ; c < fly; c++ ) {
                TW.rowMajorAset(data,r,c,color);
            }
        }
    }

    // console.log("doing 7 red (black) stripes");
    for( i = 0 ; i < 13 ; i+=2 ) doStripe( i, RED );
    // console.log("doing 6 white stripes");
    for( i = 1 ; i < 13 ; i+=2 ) doStripe( i, WHITE );
    // union
    var unionHoist = 7 * stripe_height;
    var unionFly = Math.round(0.76 * hoist); // from flag spec
    for( i = 0 ; i < unionHoist; i++ )
        for( j = 0 ; j < unionFly; j++ )
            TW.rowMajorAset(data,i,j,BLUE);
    return data;
}
The doStripe() function is essential, and it relies on a function to set a
byte of an array using row major order. I called this function
rowMajorAset(), from a CommonLisp function of a similar name:
function (array2D, i, j, val) {
    // Sets element in row i, column j of a 2D array of bytes
    TW.isArray2D( array2D );
    var height = array2D.height;
    var width = array2D.width;
    if( i > height ) throw "array row out of bounds: "+i+" > "+height;
    if( j > width ) throw "array col out of bounds: "+j+" > "+width;
    array2D[ i*width + j ] = val;
}
RGB Flag
If you’re not too exhausted, let’s look at computing the red, white, and blue
flag. Again, all the details aren’t important, but I do want you to understand
how to set elements of the array, which is done with this function,
TW.rowMajorAsetRGB():
function (arrayRGB, i, j, R, G, B) {
    // Sets element in row i, column j of a 2D array of RGB values
    // the element is set to the given R, G, B arguments
    TW.isArrayRGB( arrayRGB );
    var height = arrayRGB.height;
    var width = arrayRGB.width;
    if( i > height ) throw "array row out of bounds: "+i+" > "+height;
    if( j > width ) throw "array col out of bounds: "+j+" > "+width;
    var index = i*width+j
    arrayRGB[ 3*index + 0 ] = R;
    arrayRGB[ 3*index + 1 ] = G;
    arrayRGB[ 3*index + 2 ] = B;
}
Here’s the finished code for TW.createUSFlagRedWhiteBlue(). Skim most of it
and just look at the lines that fill in the stripes and the union (around line
30).
function (log2size) {
    // returns an array containing a red, white and blue USFlag pattern
    // where the size is width x height where height = 2^log2size and
    // width is twice that.
    var height = TW.power2(log2size);
    var width = height * 2;
    var i, j, n = 0, len = width * height * 3;
    var data = new Uint8Array( len );
    data.width = width;
    data.height = height;
    for( i = 0 ; i < len; i++ ) data[i] = 0x80;  // initialize all to 50% gray
    // compute flag specs
    var stripe_height = Math.floor(height / 13);
    if( stripe_height < 1 ) {
        throw "size isn't big enough for 13 stripes: "+height;
    }
    var hoist = stripe_height * 13;
    var fly = Math.floor(hoist * 1.9);      // from flag spec
    // console.log("hoist and fly: "+hoist+", "+fly);

    function doStripe(stripeNum,r,g,b) {
        var startrow = stripeNum*stripe_height;
        var nextrow  = (stripeNum+1)*stripe_height;
        var i, j;
        for( i = startrow; i < nextrow; i++ ) {
            for( j = 0 ; j < fly; j++ ) {
                TW.rowMajorAsetRGB(data,i,j,r,g,b);
            }
        }
    }

    // console.log("doing 7 red (black) stripes");
    for( i = 0 ; i < 13 ; i+=2 ) doStripe( i, 0xFF, 0, 0 );  // RED
    // console.log("doing 6 white stripes");
    for( i = 1 ; i < 13 ; i+=2 ) doStripe( i, 0xFF, 0xFF, 0xFF );  // WHITE
    // union
    var unionHoist = 7 * stripe_height;
    var unionFly = Math.round(0.76 * hoist); // from flag spec
    for( i = 0 ; i < unionHoist; i++ )
        for( j = 0 ; j < unionFly; j++ )
            TW.rowMajorAsetRGB(data,i,j, 0, 0, 0xFF); // BLUE
    return data;
}
That’s it. Layers of abstraction help a lot.
Compression
Note that this discussion has all been about uncompressed images. Most of the image file formats that you are familiar with (GIF, JPEG, PNG) are compressed. Part of the Three.js code that loads textures has to uncompress the file so that the texture is ready for use.
Summary
Here’s what we learned
- When accessing the texture array, using texture parameters, we can either take the value of the nearest texel, or we can linearly interpolate.
- The default setting in Three.js is
THREE.LinearFilter. - We can build 2D and 3D arrays out of 1D arrays by using row major order.
Source
This page is based on https://cs.wellesley.edu/~cs307/readings/10-texture-mapping-c.html. Copyright © Scott D. Anderson. This work is licensed under a Creative Commons License.