The Instance Transform
So far, we’ve been building objects out of vertices and triangles. Effective, but slow and painful. Even getting two copies of something is a bit of work. In this reading, we’ll learn about the instance transform, which will make it much easier to work with higher-level objects, from teapots to teddy bears.
Scene Bounding Box
We learned this earlier, but just to re-cap:
The TW.cameraSetup() function is a handy way to tell TW the information it
needs to set up a camera. Its third argument is a JavaScript object with six
properties, which are the minimum and maximum x, y and z coordinates, for the
entire scene (all the objects you want to display):
var scene_bounding_box = { minx: -50, maxx: +100,
                           miny: 0, maxy: 50,
                           minz: -25, maxz: 100 };

TW.cameraSetup(renderer, scene, scene_bounding_box);
The purpose of this is to give TW the information it needs to set up the camera. If you want to see the bounding box for any of our TW demos, just press the “b” key, which toggles showing the bounding box.
Built-in Three.js Objects
Three.js comes with a large number of classes to create different kinds of Geometry objects. (Remember, a geometry is a structure with vertices, faces, and so forth.) You can see a list by scrolling down to the Geometries section of the documentation.
We’ll be working a lot with:
Demo: Plane, Box, and Sphere
Here is an example of a scene using a plane, a box, and a sphere. (Enter “b” to see the yellow wireframe bounding box.)
Here is the code:
The arguments to THREE.BoxGeometry() are just the width, height and depth.
Similarly, the arguments to THREE.PlaneGeometry() are the width and height;
it has zero depth. The argument to THREE.SphereGeometry() is the radius.
What the documentation doesn’t tell you, and it should , is the location of the origin and the arrangement of the axes. However, it’s easy to see from this example that the origin is in the center of the objects. Thus, a plane of width 6 goes from x=-3 to x=+3, and so on.
This is okay, but very limited. We next need to create instances of these classes and arrange them in the scene. We’ll get to that soon.
Demo: Polygonal Approximation
Spheres have two more arguments (at least!) called widthSegments and
heightSegments. They come about because these curved surfaces are in fact
rendered with polygonal approximations. Consider a circle. If you cut the
perimeter into N parts, and use an N-sided polygon instead of a circle, you
can approximate a circle. The larger N is, the smoother the circle is. For
example, with N=3, you’re approximating a circle with an equilateral triangle.
With N=4, you’re approximating it with a square.
You can play with the two arguments to the sphere constructor using the polygonal sphere demo.
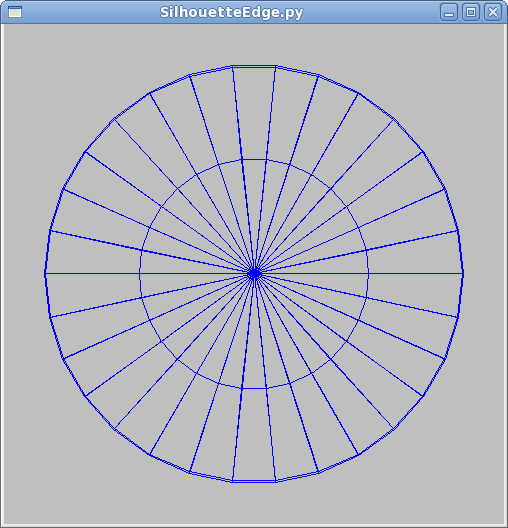
The version above has 8 widthSegments, which you can see is the number of
segments around the poles, so essentially like longitude. The version above
has 3 heightSegments, which is like latitude.
Polygonal approximations can be pretty good, particularly in the interior of a solid object if you use smooth shading. (The mesh that the demo uses draws wireframe lines, which visually detracts from the approximation.) However, the polygonal approximation can be apparent at the edges of the object; more precisely, in the silhouette. This problem is known as the silhouette edge problem. If your object will be silhouetted, you’ll have to use segments. This can make rendering slower. (An example of the general speed versus quality tradeoff.)
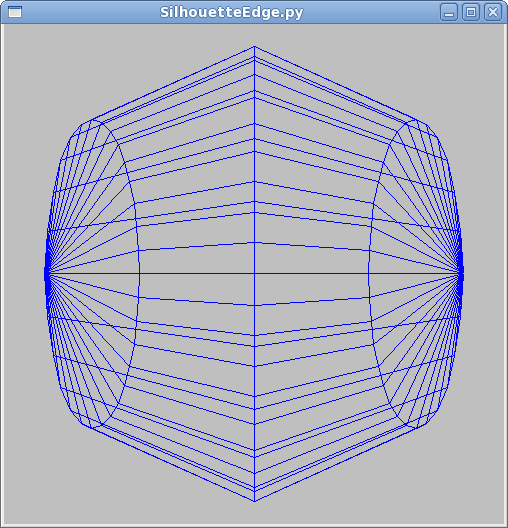
Look at the two pictures below, taken from an earlier demo. The program gives you a rendering of a wire sphere. These pictures are actually the same sphere, from the front (+Z axis) on the left and from the right (+X axis) on the right. The sphere is rendered with 30 slices but only 4 stacks, so it looks very good from +Z and terrible from +X.
Disadvantages of Built-in Objects
Is there any disadvantage to using these Three.js objects? Why did we not use
THREE.BoxGeometry for the color cube? In that case, it was convenient to
have the vertices be zeros and ones, but the THREE.BoxGeometry object of
width 2 will have x coordinates of +1 and -1. It was easier to custom build
the color cube. However, the Three.js objects are generally very good and very
flexible.
Bounding Boxes, Reference Points
In order to use one of these built-in objects, we need a “handle” on it: a way
to pick it up and put it where we want. But, where is the object? After all,
an object occupies a collection of points, but for simplicity, we want to have
a single point as the location of the object. For this course, we will call
that the reference point of the object or the object’s origin. That
is, the position of an object is the origin of the coordinate system it’s
built in. For example, the handle for the barn is its lower left front corner,
since that vertex is the origin. For the THREE.BoxGeometry object, the
handle is the center of the box.
Finally, it’s very useful to know how “big” the object is, say if you want to stack two on top of each other, or place them next to each other. Consequently, it’s convenient to talk about a “bounding box” for each object. This is like the scene bounding box we discussed above, except focused on a single object. (If there is only one object in your scene, they are the same.)
Note that the definitions of the bounding box for an object and for the scene are the same (the min/max coordinates in X, Y and Z), but the purpose is different. The bounding box for the scene is used by TW to set up the camera for you. (If you’re setting up your own camera, you don’t need to bother with a scene bounding box at all.) The bounding box for an object is used by the programmer to help place objects in the scene without having them intersect each other.
Let’s look again at our example of how to use a Three.js box:
Where is the cube? In this case, we know that the coordinates are +/- 3, 2, and 1. The bounding box is the same.
Placing Instances
Please take some time to play with the
The barn instance has three kinds of state:
- position : this is a
THREE.Vector3object with x, y, and z components that place the origin of the barn at that location in the scene. - rotation : this is a
THREE.Eulerobject that first rotates the object by some angle about its X axis, then by some angle about its Y axis, and then by some angle about its Z axis. (You can also change the order of the rotations if you wish; I’ve rarely found that necessary.) - scale : this is a
THREE.Vector3object that indicates the scaling of the barn along its X, Y, and Z axes.
Note the order of these operations. The positioning is done in the scene’s coordinate system, before the barn rotates around any of its axes. The scaling is done last, so the units of the positioning don’t depend on the scaling. (Imagine we move the barn by two units, but scale things so that each unit is now ten times as big: do we move by two (original) units or twenty?)
Let’s look at each of these geometric transformations in more detail.
Demo: Positioning/Translation
You can think of positioning an instance as drawing it in a coordinate system where the origin has moved (been translated ) relative to the scene origin. Thus, none of the vertices needs to be changed, they are just transformed. We’ll look more at the mathematics of this in a future reading.
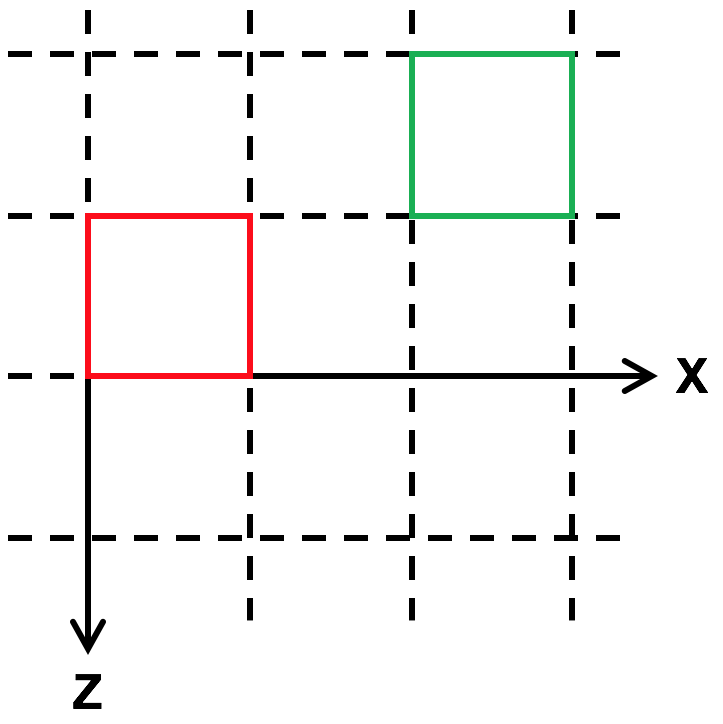
Here is a demo that positions two barns, one translated relative to the other, as shown in the birds’ eye view (along the Y axis) above:
The code that produced this demo is shown below. The
TW.createBarnSolidColor() function creates and returns a THREE.Mesh
object, whose position is set with position.set().
The red barn is drawn at the origin; its origin coincides with the scene origin. The green barn is drawn such that its origin (its front left corner) is at the specified position.
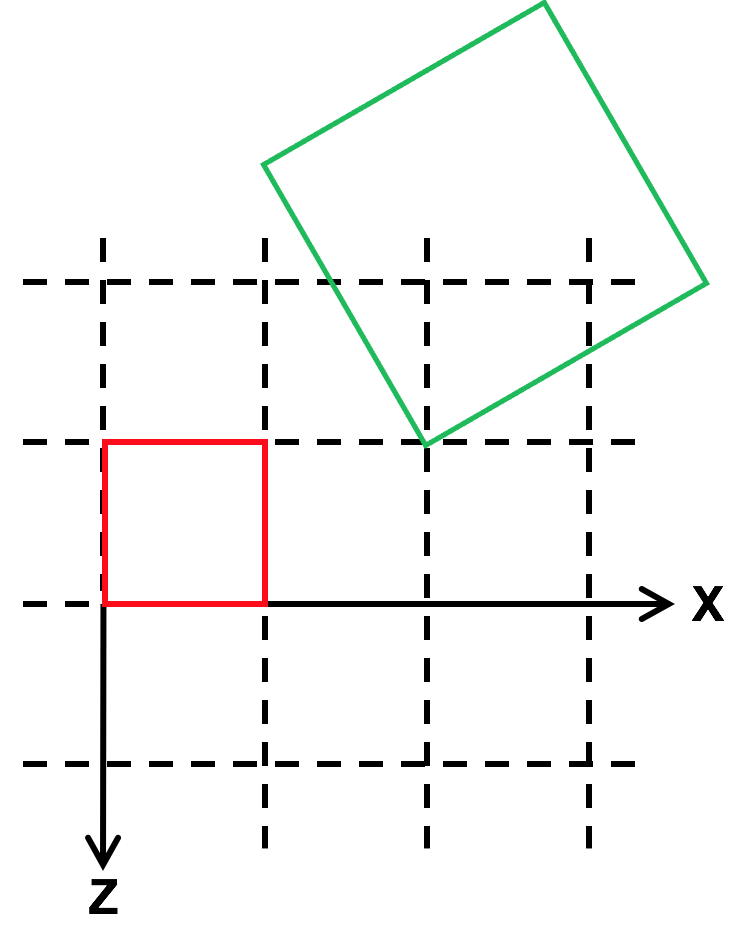
Demo: Rotation
Rotation works similarly to positioning, except that you set the three angles that you want to rotate the object by.
Note that the rotations are in radians. So, if you want to rotate something by a quarter turn around the x axis, use one of the following:
obj.rotation.x = Math.PI/2obj.rotation.x = THREE.Math.degToRad(90)obj.rotation.x = TW.degrees2radians(90)
Also, the direction of rotations is crucial. If you imagine that the Z axis is pointing directly at your nose and you are looking at the XY plane, +90 degrees is counter-clockwise and -90 is clockwise. Similarly, the rotations described in the above list are all counter-clockwise around the X axis.
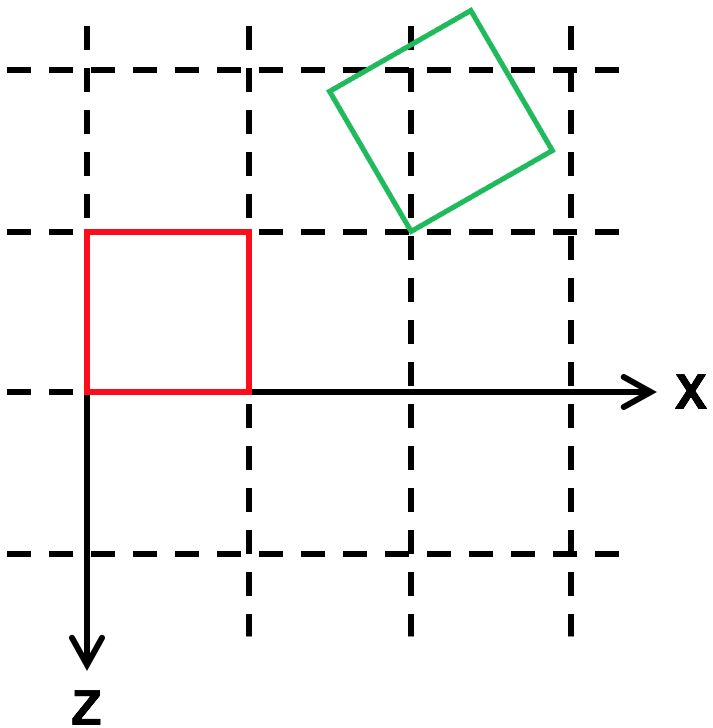
In the demo below, the green barn is drawn in a coordinate system that is rotated by 30 degrees around the Y axis of the barn. The result, in wireframe from above, might look like:
The code that produced this demo is shown below. The rotation angle for the
THREE.Mesh object returned by TW.createBarnSolidColor() is set with
rotation.set().
Demo: Scaling
Finally, we can scale the geometry system. Typically, this is just a positive multiple, but by multiplying by a negative value, you can flip something around.
Here, we translate, rotate, and then double the size of the green barn:
The code that produced this demo is shown below, with the scale of the
greenbarn mesh object set with scale.set():
Demo: Blocks
Now, look at the demo for this jumble of blocks. Look at it from different angles to get a better sense of their relative positioning, rotation and scaling. (Enter “a” to see the scene axes.)
Below is the code that produced this demo. Compare the code and the rendering,
to make sure you understand. The TW.wireCube() function creates a new
THREE.BoxGeometry(1,1,1).
Absolute versus Relative
Note that the three properties we’ve been looking at are “absolute”, in the sense that we specify the value we currently want, regardless of the current value. Suppose we wanted to “modify” the current value. For example, to move a block over by a bit, we could do the following:
box.position.x += 2;
The position property is a THREE.Vector3, which has properties x, y, and z
that we can look at and modify.
The above code is equivalent to the following method:
box.translateX(2);
The translateX() method “translates” (“moves” or, equivalently, “modifies
the position of”) by some amount.
There is an even more general method:
var dir = new THREE.Vector3(3,4,5);
dir.normalize();
box.translateOnAxis(dir,dist);
This moves the box by some distance in the specified direction. This can be very useful when animating a scene.
Similarly, you can change the rotation of an object:
var axis = new THREE.Vector3(3,4,5);
axis.normalize();
box.rotateOnAxis(axis,radians);
This rotates the object around the given axis by some number of radians. Again, this can be very useful for animations, where you want to rotate the box by some amount every frame, say because it’s tumbling as it falls.
As far as I know, there is no relative version of scaling.
Coordinate Systems
It’s important to remember that the initial coordinate system has the Z axis
coming out of the screen. You can, of course, modify this by setting the
position, rotation, and scaling of the Scene object.
When you translate, rotate, or scale, you change the coordinate system for all subsequent operations within that object. That is, you change the interpretation or meaning of coordinates. The vertex (2,3,4) means something different as a result. We haven’t looked at nested objects yet, but will soon. Keep this in mind.
However, translation, rotation and scale are affine transformations, which means that lines stay lines and planes stay planes. Therefore, to transform a line, you transform the endpoints and draw the line between the transformed endpoints.
So, one take-home message of this reading is:
Define your object in a coordinate system that is convenient, then use affine transformations to place it in the scene.
In simple cases, we can usually place the object we want by setting the
position, rotation and scale.
Source
This page is based on https://cs.wellesley.edu/~cs307/readings/04-instance-transform.html. Copyright © Scott D. Anderson. This work is licensed under a Creative Commons License.